A dunnage bag only works when its size matches the void it has to fill. A bag that is too small either won't reach the cargo or presses against it with a tiny contact area. A bag that is too big bulges above the pallets and rubs against the roof or side wall. This practical guide shows how to measure the gap between pallets, how to choose a dunnage bag size from the Viskom range using a selection table, what pressure to aim for, how to inflate the bag correctly and which mistakes to avoid.
If you are new to the topic, start with our overview "How to Protect Cargo in Containers: Dunnage Air Bags and Load Securing". This article is the next step: specific sizes, figures and a step-by-step routine.
How a dunnage bag works and why size matters most
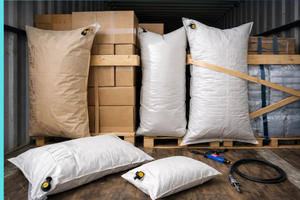
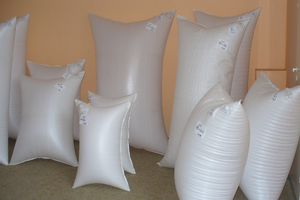
A dunnage air bag is a two-layer bag with a valve. You place it in the void between packages and inflate it. The bag pushes the cargo sideways, so pallets, crates or drums cannot shift when the truck brakes, corners or the ship rolls. The force a bag can hold depends on two things: the pressure inside and the area with which the bag presses against the cargo.
This is where the main trap lies. When a bag inflates in a wide gap, its edges round off and part of the fabric no longer touches the load. The wider the gap, the smaller the working area. That is why the same bag works well in a 15 cm gap and is almost useless in a 40 cm gap.
What we know about Viskom dunnage bags
All data below come from the product pages in the Viskom dunnage bag catalogue:
- Construction: inner layer of polyethylene (PE), 70 µm; outer layer of laminated woven polypropylene, 100 g/m². The bag has an inflation/deflation valve.
- Sizes: widths from 600 to 1500 mm, lengths from 600 to 3000 mm. The most popular items are 900×1200 mm and 900×1800 mm.
- Gap: according to the category description, the bags fill voids from 10 to 60 cm wide, depending on bag size.
- Pressure: the specifications list 2.9 PSI (about 0.2 bar).
- Strength level: most items are Level 1; some sizes are also available as Level 2 and Level 3.
- Temperature range in the specifications: −60 to +60 °C. The bags are waterproof and reusable when handled correctly.
- Use: road, rail and sea transport. Dunnage bags are not used for air freight.
Step 1. How to measure the gap correctly
Choose the bag by the actual gap, not by eye. Here is the routine:
- Finish loading first. Measure the gap once all pallets are in their final position and the forklift will not move them again.
- Measure at three heights: at the bottom, in the middle and at the top of the stack. Pallets are rarely perfectly straight, and the gap at the top is often wider than at floor level.
- Measure along the whole gap. If the gap is wedge-shaped, use the widest point.
- Measure the cargo height on both sides of the gap. You will need it to choose the bag length. If the stacks differ in height, use the lower one.
- Check the surfaces. Nails, pallet corners, steel strapping or sharp packaging edges can puncture the bag. Cover them with cardboard or a sheet of corrugated board.
If the gap is under 10 cm, you don't need a dunnage bag there: such narrow spaces are better filled by other means. If it is wider than 60 cm, reduce it first by moving the pallets closer or adding rigid blocking, and only then insert the bag.
Dunnage bag size chart by gap width
The 2.5 rule: bag width
A handy rule comes from amendments UNECE has proposed to the Code of Practice for Packing of Cargo Transport Units (CTU Code): neither the width nor the height of the bag should be less than 2.5 times the gap it fills. So a 20 cm gap needs a bag at least 50 cm wide, and a 30 cm gap needs one at least 75 cm wide.
The table below applies this rule to the bag widths available at Viskom. Use it for a first choice, and always check the final decision against the product page and the marking on the bag.
| Gap between cargo | Minimum bag width (×2.5) | Viskom width | Example sizes, mm |
|---|---|---|---|
| 10–20 cm | 25–50 cm | 600 mm and wider | 600×900, 600×1200, 600×1500, 600×1800 |
| 20–24 cm | 50–60 cm | 600 mm (borderline), better 760–900 mm | 760×1520, 900×1200, 900×1500 |
| 24–30 cm | 60–75 cm | 760, 900, 910 mm | 760×1520, 900×1800, 910×1830 |
| 30–36 cm | 75–90 cm | 900–910 mm and wider | 900×1800, 900×2100, 1200×1500 |
| 36–48 cm | 90–120 cm | 1200 mm and wider | 1200×1200, 1200×1800, 1200×2400 |
| 48–60 cm | 120–150 cm | 1500 mm | 1500×1500, 1500×2100, 1500×2400 |
| over 60 cm | — | outside the range stated by Viskom | reduce the gap first |
Bag length and cargo height
Bags are usually placed with the long side vertical. The working height of the bag must not exceed the height of the cargo, otherwise the top part balloons above the pallets and holds nothing. The same UNECE proposals give a formula for the maximum bag height: bag height = cargo height + 1.07 × gap (more precisely, (π − 1) / 2 × gap). A bag gets slightly "shorter" as it inflates, so it can be a little longer than the cargo is high.
Example 1. Pallets 1.5 m high, gap 18 cm. Minimum bag width: 18 × 2.5 = 45 cm, so a 600 mm width works. Maximum length: 1.5 + 1.07 × 0.18 ≈ 1.69 m. Choose 600×1500 or 600×1650 mm.
Example 2. Pallets 2.0 m high, gap 30 cm. Minimum width: 75 cm, so 760, 900 or 910 mm. Maximum length: 2.0 + 1.07 × 0.3 ≈ 2.32 m. A 900×2100 mm bag fits, while 900×2400 mm is already too tall.
How much area actually does the work
The CTU Code gives a simple formula for the contact area between bag and cargo: A = (width − 1.57 × gap) × (height − 1.57 × gap). It shows clearly why width matters. In a 20 cm gap, a 600×1800 mm bag presses on the cargo with about 0.43 m², while a 900×1800 mm bag uses about 0.87 m², twice as much. At the same pressure, the second bag holds twice the load.
To calculate the exact force a bag can hold, you also need the burst pressure of the specific model. The CTU Code multiplies it by the contact area and a safety factor of 0.75 for single-use bags and 0.5 for reusable bags. The product pages do not list burst pressure, so for heavy loads ask a Viskom manager.
What pressure do you need?
What the specifications say
The Viskom dunnage bag specifications list 2.9 PSI, about 0.2 bar. Use this value and the marking on the bag itself as your guide. The CTU Code asks for one thing: follow the manufacturer's instructions on filling pressure and maximum gap exactly.
Why you shouldn't add "a bit extra"
Inflate the bag to its working pressure with only a slight overpressure. With too little pressure, the bag can loosen when the temperature drops or atmospheric pressure rises. With too much, it can burst or damage the cargo when it gets warmer or atmospheric pressure falls, for example on a mountain pass. So plan for the route: shipping from a cold warehouse to a warm region, or across mountains, needs extra attention to pressure.
Strength level
Bags are marked with strength levels, Level 1 to 5, according to the criteria of the Association of American Railroads (AAR). The higher the level, the stronger the bag. Most Viskom sizes are Level 1, and some items are available as Level 2 and 3. If you ship very heavy cargo, or by rail where shocks are stronger, discuss the level with a manager.
How to inflate a dunnage bag: step by step
- Prepare the air supply. You need a compressor and a quick-release dunnage bag inflator gun. According to the manufacturer, the gun fits standard compressed-air connections and draws in ambient air, which saves compressor capacity. Filling speed depends on the compressor output and receiver volume.
- Insert the empty bag. Spread it out in the gap with the valve facing you, so you can still reach it after the doors are closed. The bag should not lie folded on the floor or press against sharp corners.
- Center it vertically. The bag should push against the middle of the stack, not just the bottom or the top.
- Inflate to working pressure. Connect the gun to the valve and fill until the bag fills the gap tightly. Do not exceed the pressure specified by the manufacturer.
- Close the valve and check. The bag should be firm, not skewed, and should not stick out above the cargo. Push with your hand: the cargo on both sides should not move.
- Deflate after delivery. Open the valve, fold the bag and keep it for the next trip. Do not reuse damaged bags.
Common mistakes
- A bag at the doors. The CTU Code advises against using a dunnage bag in the doorway gap unless extra measures are taken, because it can push the doors open violently. Use rigid blocking at the doors.
- A narrow bag in a wide gap. The bag rounds off, the contact area drops and the cargo moves. Check the 2.5 rule.
- A bag taller than the cargo. The top balloons above the pallets, pressure is distributed unevenly and the fabric rubs against the roof.
- Sharp edges. Nails, strapping and pallet corners puncture the bag in transit. Cover them with cardboard.
- Overinflating "just in case". Extra pressure doesn't make the load safer; it raises the risk of bursting when the temperature changes.
- A gap outside the range. Under 10 cm or over 60 cm is not a job for a dunnage bag. Change the loading plan first.
What to combine dunnage bags with
A dunnage bag fills the voids between packages, but it does not hold the boxes inside a stack together. For complete load securing, combine it with other products:
- anti-slip interlayer paper between layers of boxes on a pallet stops them from sliding. Learn more in "Anti-Slip Paper for Pallets";
- strapping the stack holds the boxes together. See "Strapping Band: Reliable Fastening and Load Safety";
- rigid blocking at the doors and side walls, such as the Wistra aluminium cargo bar. Other options are in the load securing equipment section.
We covered how dunnage bags work specifically with pallets in "Securing Pallets with Dunnage Air Bags".
FAQ
Which dunnage bag should I use if the gaps in the truck differ?
Choose a bag for each gap separately using the table. In practice, it helps to keep two or three sizes on hand: for example, 600 mm wide for narrow gaps and 900 mm for wider ones.
Can I put two bags into one wide gap?
It is better to reduce the gap first by moving the cargo, or to use a wider bag. If you do use several bags, each must meet the 2.5 rule for its part of the gap. For non-standard layouts, consult a Viskom manager.
How many times can a dunnage bag be reused?
Viskom states that the bags are reusable and their service life depends on correct use. Check the fabric and valve before every trip. Never use a bag with a cut, a puncture or a faulty valve.
Can I inflate a bag without an inflator gun?
You need a compressed-air source and a tool that fits the valve. The Viskom gun is designed for the valves of these bags, so it is the fastest and most convenient way to fill them.
Are dunnage bags suitable for sea containers?
Yes. According to Viskom, the bags are used in road, rail and sea transport; they are waterproof and suitable for high humidity. Dunnage bags are not used for air freight.
Summary
Choosing a dunnage bag comes down to three steps. Measure the widest point of the gap and the cargo height. Pick a bag at least 2.5 times wider than the gap, with a length that doesn't extend beyond the cargo height. Inflate it to the pressure specified by the manufacturer, without overinflating. Sizes from 600×600 to 1500×3000 mm and an inflator gun are available in the Viskom dunnage bag catalogue. If you are unsure about size or level, send a manager your gap sizes and cargo height and they will help you choose.
Read also: